Setup Rocketship in Autotask Dashboard
This article describes how to create a full-screen dashboard in Autotask for the Rocketship WorkBoard.
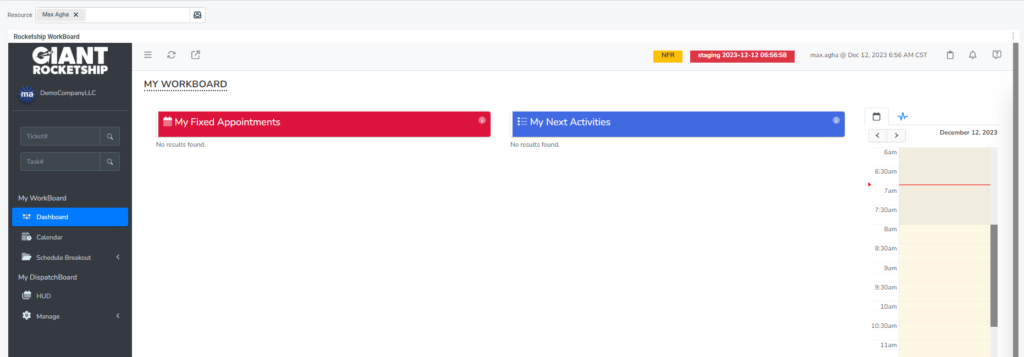
When complete, your team will have access to the Rocketship WorkBoard as a full dashboard inside of Autotask, as shown in the example below:

Create Shared Tab
- Login into Autotask as an Admin
- At the top, click on the graph icon next to the Search button in Autotask
- Click Manage Shared Tabs
- Click New Tab
- Set Tab Name = Rocketship WorkBoard
- Click Save
Add Rocketship Widget to Shared Tab
You now have a “blank slate” Dashboard. You will see an “Add Widget”.
- Click on the + Add Widget
- Click “Choose an integration vendor widget from the widget library”
- Click Next
- Click “Rocketship WorkBoard”
- Click Next
- In the Layout/Size, choose the last option that is 4 arrows pointing outward!
- Click Finish
Share Tab
Finally, let’s share the new Tab to your team.
- In the Design Tab, click the Back Arrow next to “Design Tab” (or simply return to the Shared Dashboards Tab menu via the graph icon at the top of the Autotask window)
- Hover on the hamburger menu for “Rocketship WorkBoard” and click Publish
- Click on Departments (you can publish via Security Levels, Departments, or directly to Resources, in this example we will use Departments)
- Share to all Departments listed
- Click the Back Arrow next to Publish Tab
Notes
If you don’t have permissions to create Shared Tabs (dashboards) in Autotask, you can fix that by following the steps in this KB.
