In Autotask, when you set a ticket to Waiting Customer, you will want it to auto-close after a certain amount of time. Otherwise, that ticket steals mindshare and adds to your ticket overhead. (It also trains your customers to not respect your time.) That said, there is a right way and a wrong way to do this.
The right way:
- The customer should be notified the ticket is auto-closing
- You should track which tickets auto-close vs are tech-closed
- Don’t let customers re-open old tickets when the customer “remembers”
Before starting, be sure to do these things:
- Create a ticket status “Pending Auto-Close”
- Create a ticket UDF Single-Select List “Auto-Close Status” with the options None, Warned, Closed.
- Create a Service Desk Notification Template that warns the customer the ticket is being auto-closed due to non-response and they have 1 business day before the auto-close completes.
Notify Customer of Auto-Close
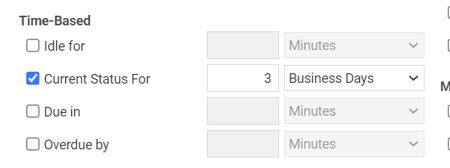
First, create an Autotask Workflow Rule (WFR) that is time-based that triggers after X business days. For our fictional MSP, let’s decide that we will begin the auto-close process after 3 business days. We will not update the ticket to Completed but instead Pending Auto Close. This gives us a better path to managing auto-close tickets, as you’ll see later.
Let’s call the WFR “Auto-Close: Send to Pending Close” and set it to trigger after the ticket is in a given Status for 3 business days:

Next, restrict this WFR to only impacting tickets with status Waiting Customer:

When triggered, the WFR should update the ticket status to Pending Auto Close, a ticket status I created in Autotask for this specific need:

Next, click on Notifications Tab and click Ticket Contact as the Recipient. For the Notification Template, select the one you crafted earlier. For the subject, I recommend the default be clear, e.g., “We are auto-closing your ticket in 1 business day RE: ….” If they respond within this 1 business day period, great. Your tech can now proceed.
Re: the WFR, don’t save just yet! You have more work to do to further reduce your admin overhead long-term.
Track Tickets that Auto-Close
This is key: It’s important to track what customers do. You may have some great customers that require little effort, while others require a lot of effort. Ignoring you and your team should be at the top of the list of “lots of effort,” so let’s track it.
In addition to updating the Ticket Status, let’s flag this ticket using the UDF field we created earlier:

You can easily create dashboard widgets and LiveReports using that UDF to use in weekly, monthly, quarterly meetings to have “real talk” with customers who complain about response times to only be confronted by how they never respond when your team reaches out. This UDF field is a big deal! Use it.
Now Save&Close your new WFR.
Don’t Allow re-opens
At this point, after the 3 business days, the customer gets a warning and the ticket moves to Pending Auto Close per the above WFR. Now what?
We need to create a 2nd WFR that auto-closes any ticket in Ticket Status “Pending Auto Close” after 1 business day. No customer notification is needed. You already sent one. I would name it “Auto-Close: Send Pending Close to Completed” so that this “pair” of WFRs stick together.
HOMEWORK: In the 2nd WFR, update the UDF you created from Warned to Closed. Now you can track which customers listen to you, which need gentle reminders, and which ignore you completely all using a single UDF.
The real trick here is that customers, especially the ones that ignore you, will suddenly remember you when they are ready. If you respond to them, you may as well have not done any of this. Your numbers will be off, your SLAs skewed, etc. Here’s a better approach:
- Create a WFR that re-closes a re-opened ticket and warns the customer you did it.
It’s easier than you think. What you’ll need for today’s little workshop:
- Create a Service Desk Notification “You tried to re-open a closed ticket”
- Create a Ticket UDF named “Re-Open Status” with the Single Select List values of None, Attempted, Approved.
Create a new WFR that triggers on the “Edited By” event. Next, restrict it. Assuming an email from the customer updates your ticket to something reasonable like “Customer Responded”, here are your WFR conditions:

See what we did there? This WFR only triggers when a ticket WAS in Complete but updated to Customer Responded. If you have Autotask configured correctly, that should ONLY happen when a customer responds.
Now, let’s offer some sweet WFR justice! In Ticket Updates, update Re-Open Status to “Attempted” and slam the ticket back to Complete:

The update above makes the sound of “no sir!” when it executes. If you listen carefully you can just hear it. But, painful justice must always come with compassionate education and growth, so let’s also remind the customer of what they SHOULD do.
Critical: Your notification template should have a warning that their response was not read because the ticket was already closed. It should then include clear, short instructions on how to open a new ticket. Be sure to update the WFR Notification to include the Ticket Contact and this Notification Template.
Side note: Why the Approved list option for the Re-Open Status UDF? You can create another WFR that sets this to Approved if a ticket goes from Complete to any status OTHER than Waiting Customer, meaning you or your team manually re-opened the ticket. Just a nice bow on the present under the Christmas tree if you want to try it out.
Share via: