In this blog, I’ll walk you through how to customize email signatures in outbound Autotask notifications. I also include a short 3 minute YouTube video if you prefer that way of digesting info. Note, almost everybody does this incorrectly at first. I’ll walk you through the correct solution.
For our example, let’s setup an email signature for Autotask ticket notifications to include:
- Tech name
- Tech title
- Support phone number
To do this, we’ll follow these steps:
- Add the employee title to each Autotask Resource entry.
- Update each relevant Notification Template to include the Resource info and support ph#
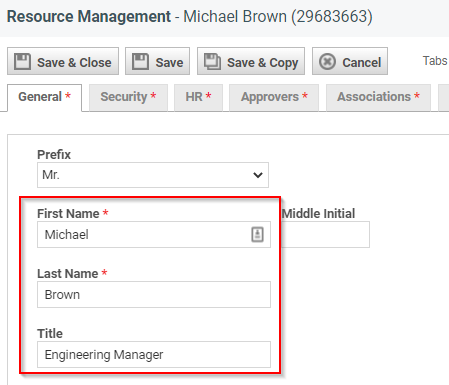
Autotask Resource Fields
Let’s ensure every Resource has their full name and title set. This is done via Admin->Resources (Users). You can then filter by License Type or Resource (tech) name as needed and then Edit that Resource. Be sure to set their name and title, as shown below:
Update Notification Template
Now, let’s edit the Notification Template that Autotask uses for outbound emails. It’s important to realize here that this may vary by site. Some sites keep things simple and use the same Autotask Notification Template for all outbound emails, while others have multiple templates, each for a specific Use Case (e.g., Ticket Notes for techs vs Ticket Notes from an account executive/sales). We’ll assume you are using the “out-of-the-box” settings of having a template for Ticket Time Entry and one for Ticket Note.
- Go to Admin->Notification Templates
- Click the Service Desk tab
- Edit “Ticket Time Entry – Created or Edited“
- Add the lines noted below into the area where you want a signature
- Click Save & Close
The most common mistake people make here is to use the Resource entity in the Variables dropdown. That’s a mistake. That refers to the Primary Resource, who may, or may not, be the person sending the email. Instead, be sure to select the “Initiating Resource” to ensure the email signature is properly mapped to the person sending the outbound notification.
Again, I’ve included the correct information below:
[Miscellaneous: Initiating Resource Name]
[Miscellaneous: Initiating Resource Title]
[Miscellaneous: Your Company Name]
Call us for help: 555-555-5555
You should repeat this for the Ticket Note – Created notification as well!